Shared Storage (GlusterFS)
While Docker Swarm is great for keeping containers running (and restarting those that fail), it does nothing for persistent storage. This means if you actually want your containers to keep any data persistent across restarts (hint: you do!), you need to provide shared storage to every docker node.
Warning
This recipe is deprecated. It didn’t work well in 2017, and it’s not likely to work any better now. It remains here as a reference. I now recommend the use of Ceph for shared storage instead. – 2019 Chef
Design
Why GlusterFS?
This GlusterFS recipe was my original design for shared storage, but I found it to be flawed, and I replaced it with a design which employs Ceph instead. This recipe is an alternate to the Ceph design, if you happen to prefer GlusterFS.
Ingredients
3 x Virtual Machines (configured earlier), each with:
- CentOS/Fedora Atomic
- At least 1GB RAM
- At least 20GB disk space (but it’ll be tight)
- Connectivity to each other within the same subnet, and on a low-latency link (i.e., no WAN links)
- A second disk, or adequate space on the primary disk for a dedicated data partition
Preparation
Create Gluster “bricks”
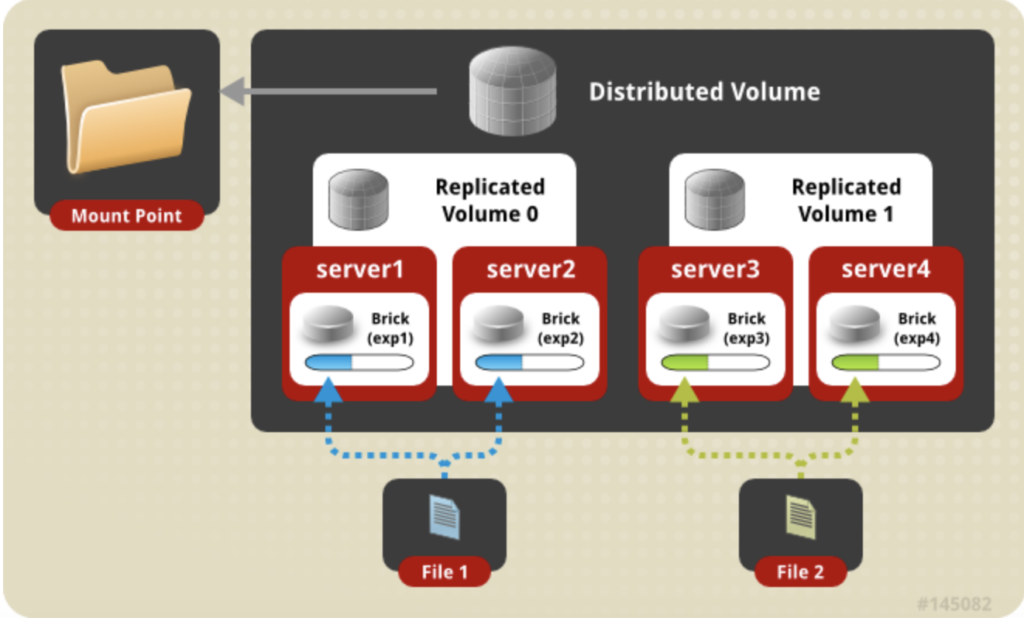
To build our Gluster volume, we need 2 out of the 3 VMs to provide one “brick”. The bricks will be used to create the replicated volume. Assuming a replica count of 2 (i.e., 2 copies of the data are kept in gluster), our total number of bricks must be divisible by our replica count. (I.e., you can’t have 3 bricks if you want 2 replicas. You can have 4 though – We have to have minimum 3 swarm manager nodes for fault-tolerance, but only 2 of those nodes need to run as gluster servers.)
On each host, run a variation following to create your bricks, adjusted for the path to your disk.
The example below assumes /dev/vdb is dedicated to the gluster volume
(
echo o # Create a new empty DOS partition table
echo n # Add a new partition
echo p # Primary partition
echo 1 # Partition number
echo   # First sector (Accept default: 1)
echo   # Last sector (Accept default: varies)
echo w # Write changes
) | sudo fdisk /dev/vdb

mkfs.xfs -i size=512 /dev/vdb1
mkdir -p /var/no-direct-write-here/brick1
echo '' >> /etc/fstab >> /etc/fstab
echo '# Mount /dev/vdb1 so that it can be used as a glusterfs volume' >> /etc/fstab
echo '/dev/vdb1 /var/no-direct-write-here/brick1 xfs defaults 1 2' >> /etc/fstab
mount -a && mount
Don’t provision all your LVM space
Atomic uses LVM to store docker data, and automatically grows Docker’s volumes as requried. If you commit all your free LVM space to your brick, you’ll quickly find (as I did) that docker will start to fail with error messages about insufficient space. If you’re going to slice off a portion of your LVM space in /dev/atomicos, make sure you leave enough space for Docker storage, where “enough” depends on how much you plan to pull images, make volumes, etc. I ate through 20GB very quickly doing development, so I ended up provisioning 50GB for atomic alone, with a separate volume for the brick.
Create glusterfs container
Atomic doesn’t include the Gluster server components. This means we’ll have to run glusterd from within a container, with privileged access to the host. Although convoluted, I’ve come to prefer this design since it once again makes the OS “disposable”, moving all the config into containers and code.
Run the following on each host:
docker run \
   -h glusterfs-server \
   -v /etc/glusterfs:/etc/glusterfs:z \
   -v /var/lib/glusterd:/var/lib/glusterd:z \
   -v /var/log/glusterfs:/var/log/glusterfs:z \
   -v /sys/fs/cgroup:/sys/fs/cgroup:ro \
   -v /var/no-direct-write-here/brick1:/var/no-direct-write-here/brick1 \
   -d --privileged=true --net=host \
   --restart=always \
   --name="glusterfs-server" \
   gluster/gluster-centos
Create trusted pool
On a single node (doesn’t matter which), run docker exec -it glusterfs-server bash to launch a shell inside the container.
From the node, run gluster peer probe <other host>.
Example output:
[root@glusterfs-server /]# gluster peer probe ds1
peer probe: success.
[root@glusterfs-server /]#
Run gluster peer status on both nodes to confirm that they’re properly connected to each other:
Example output:
[root@glusterfs-server /]# gluster peer status
Number of Peers: 1

Hostname: ds3
Uuid: 3e115ba9-6a4f-48dd-87d7-e843170ff499
State: Peer in Cluster (Connected)
[root@glusterfs-server /]#
Create gluster volume
Now we create a replicated volume out of our individual “bricks”.
Create the gluster volume by running:
gluster volume create gv0 replica 2 \
 server1:/var/no-direct-write-here/brick1 \
 server2:/var/no-direct-write-here/brick1
Example output:
[root@glusterfs-server /]# gluster volume create gv0 replica 2 ds1:/var/no-direct-write-here/brick1/gv0  ds3:/var/no-direct-write-here/brick1/gv0
volume create: gv0: success: please start the volume to access data
[root@glusterfs-server /]#
Start the volume by running gluster volume start gv0
[root@glusterfs-server /]# gluster volume start gv0
volume start: gv0: success
[root@glusterfs-server /]#
The volume is only present on the host you’re shelled into though. To add the other hosts to the volume, run gluster peer probe <servername>. Don’t probe host from itself.
From one other host, run docker exec -it glusterfs-server bash to shell into the gluster-server container, and run gluster peer probe <original server name> to update the name of the host which started the volume.
Mount gluster volume
On the host (i.e., outside of the container – type exit if you’re still shelled in), create a mountpoint for the data, by running mkdir /var/data, add an entry to fstab to ensure the volume is auto-mounted on boot, and ensure the volume is actually mounted if there’s a network / boot delay getting access to the gluster volume:
mkdir /var/data
MYHOST=`hostname -s`
echo '' >> /etc/fstab >> /etc/fstab
echo '# Mount glusterfs volume' >> /etc/fstab
echo "$MYHOST:/gv0                /var/data      glusterfs       defaults,_netdev,context="system_u:object_r:svirt_sandbox_file_t:s0"  0  0"  >> /etc/fstab
mount -a
For some reason, my nodes won’t auto-mount this volume on boot. I even tried the trickery below, but they stubbornly refuse to automount:
echo -e "\n\n# Give GlusterFS 10s to start before \
mounting\nsleep 10s && mount -a" >> /etc/rc.local
systemctl enable rc-local.service
For non-gluster nodes, you’ll need to replace $MYHOST above with the name of one of the gluster hosts (I haven’t worked out how to make this fully HA yet)
Serving
After completing the above, you should have:
- Persistent storage available to every node
- Resiliency in the event of the failure of a single (gluster) node




Responses